Recording customer payments is one of your more pleasant accounting tasks. Depending on the situation, you can choose from multiple ways to do this using QuickBooks Online.
If you made New Year's resolutions this last January, you've probably had to revise them. No one knew what was coming when 2019 turned over to 2020. We hope that despite the turmoil and disruption of the last six months, you've managed to stay healthy and keep your small business running.
It's more important than ever to conscientiously record all of the money coming into your company and ensure that it gets deposited into your account(s). QuickBooks Online offers several ways to accomplish this. Whether you're receiving payment on an invoice, documenting an instant sale, or selling on the road - the site provides tools to make certain that your receipt of the funds is entered in the correct place.
Delayed Payments
Do you send invoices for products and/or services? If so, there's more than one way to record payments when they come in. You can, of course, just open the invoice and click Receive payment in the upper right corner. We find, though, that going to the All Sales screen gives us a chance to check the status of other pending transactions. Click Sales in the toolbar, then All Sales.
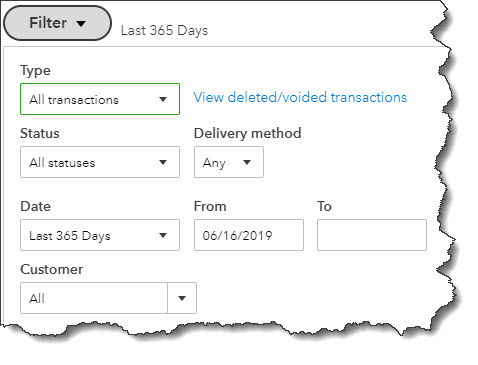
If your list isn't very long, you can just look for the invoice number. If not, you can use the Filter tool to find the original form. Click the down arrow next to Filter in the upper left to see your search options here (Status, Customer, etc.).

Once you've found the invoice, look down toward the end of that row. In the Action column, you'll see Receive payment. (While you're there, click the down arrow to familiarize yourself with the other options.) When the Receive Payment window opens, select the Payment method that applies. Leave the Deposit to field showing Undeposited Funds and look over the rest of the screen to make sure everything is accurate. Print it if you'd like and/or add an Attachment using the links at the bottom, then Save it.
Tip: Customers tend to pay invoices faster if you allow them to make payments online. If you're not yet set up for this, we can help you.
Instant Payments
Your business may collect payments at the time you provide a product or service. When this happens, you'll want to supply your customers with a sales receipt instead of an invoice (this is also important for your own records). Click the +New button in the upper left and select Sales receipt under Customers to open a blank form. You'll fill this out just like you would an invoice, by selecting the Customer first, then entering or selecting any data needed for the other fields.
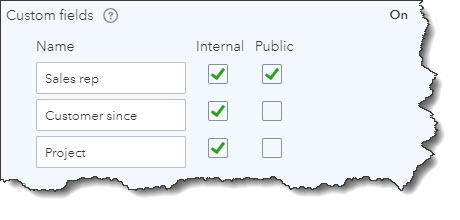
If you don't anticipate needing all of the fields on your sales forms, you can remove some of them and even add your own. Ask us how this works.

When you've completed all of the fields in your sales receipt, you can preview and print it. You can also save and email it to the customer.
Going Mobile
If you generate sales on the road, you can still create sales receipts for customers using the QuickBooks mobile app. Just click the plus (+) sign at the bottom of the screen and select Sales Receipt. The form is similar to the one you'd use on your desktop computer, though the layout is different, of course.
Having a QuickBooks Payments account is especially helpful when you're making mobile sales. You can even swipe your customers' credit and debit cards if you order a card reader from Intuit. We can walk you through this process.
You don't ever want to record a payment incorrectly, of course, but it's especially important right now to ensure that you're accounting for every dollar that comes in. Please stay healthy and safe, and let us know if we can help in any way with your accounting and your use of QuickBooks Online.

Connect Your Bank Accounts to QuickBooks Online
Save heaps of time and minimize errors.
.png) Heather Palermo
Heather Palermo

